Preparing Garden Beds
Preparing Garden Beds is straight forward, and once you get the basics down they’re very easy to maintain. The most important aspect in garden bed preparation is deep soil penetration. This is attained by a digging method called double digging. The Double digging process will aerate and improve soil structure down to 24 inches (61 cm).
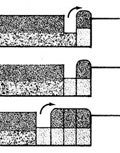
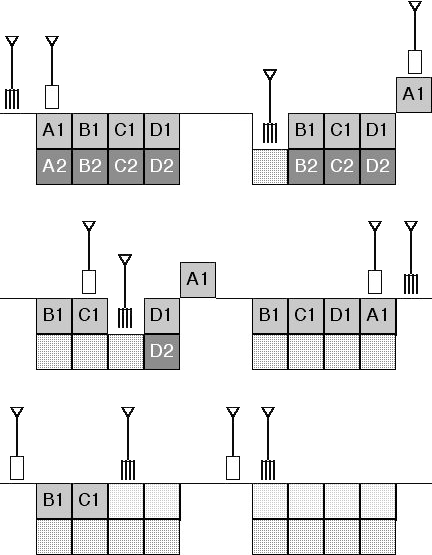
Double digging loosens the soil in two layers. First, the top layer is dug off with a spade down to 12 inches (30.5cm), forming a trench, and then the under-layer (at the bottom of the trench) is loosened with a garden fork.
A second trench is then started, backfilling the first trench. This process is repeated until the whole bed has been treated. There will be soil left over from the first trench, which is used for your compost pile. I find double digging great exercise!

Laying the Garden Beds Out
- Stake out your bed
Use a dimension of 5 ft (1.65 m) wide by 20 ft (6 m) long. Do not go less than 3 ft (1 m) wide or use lose the advantage of garden beds. There’s a real advantage in keeping your beds at 100 square ft (10 square m). For the rest of the instruction, it will be assumed that your beds are this size. - Optionally, use string to tie all the stakes together.
Removing Established Weeds and Debris before Preparing Garden Beds
- Once the bed has been laid out, use a Garden Round Point Shovel to scrap the weeds or other plant material at the soil surface inside the staked area. Try not to scrape too much soil.
- As you scrape, rake the weeds to one side so you can see
your progress.
I live in a semi-arid area so the bed area is very dry and scraping the weeds works for me. In areas where the soil is moist, you may have to pull and scrape the weeds or just pull. Pulling is ideal because you get more biomass with the roots attached. - When you’re done removing the plant material and debris,
place all them in a pile off to the side. You will use this material
for building
your compost pile as the green layer.
Note: If these are pernicious perennial weeds, do not use them in your compost.
Soak the Area
- This step is optional for those that have hard dry soil. In
my area, I need to soak the soil first before double digging. My soil
is a hard dry clay-loam soil that is almost impossible to dig when it’s
dry.
Soak the soil with a soaker hose for a couple of hours. You can find a great soaker hose here. Let it dry out for a couple of days or until it’s not too moist to work.
 |
Double Dig the Site
- Starting at one end of the garden bed, dig a 12 inch
(30.5cm) deep trench across the width of the bed with a flat
garden spade (I prefer a long handle). Place the soil from
the first trench aside to be used to layer
your compost.
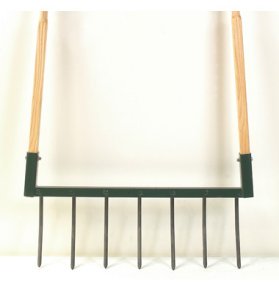
With a garden fork, loosen the 12 inches below the trench. After you loosen the bottom layer, you can place a layer of compost (determined from your soil test) on top of this bottom trench. For more moisture penetration, I sometimes fill the bottom of the trench with a few inches of water.
When the next trench is dug that soil is dropped into the empty space of the first trench, and the lower layer is again loosened with a garden fork. Try not to mix the soil as you move the soil to the next trench. This process is repeated along the full length of the bed. When you get to the end, fill the last trench with soil throughout the bed and use a Bow Rake to level and even out the bed. If there are large clods, remove them for compost use. The process of composting will break down these clouds.
Note: When preparing garden beds on new sites, it may be hard to fork all 12 inches down in the lower level, and that’s ok. My first year on my current garden site, I could hardly get 3 inches down on the bottom trench. By the second year, it was very easy to fork all the way down 12 inches. Be patient, building good soil structure and fertility is a process, and it doesn’t happen over night.

U-Bar
© JOHNNY SELECTED SEEDS
Home › Vegetable Garden Beds › Preparing Garden Beds
Return to Top of Preparing Garden Beds


Comments
Have your say about what you just read! Leave me a comment in the box below.